앞서 만든 PeriodPickerBtnView의 UI를 다른 방식으로 구현해 봅니다.
앞에서 월간, 주간, 일간을 각각 UIButton으로 만들었다면,
이번에는 먼저 UIView를 만들고, 그 안에 Label과 UIImage를 childView로 추가했습니다.
UIButton이 아닌 UIVIew를 사용하면 버튼 사이에 넣은 topSeparator와 bottomSeparator 대신
addBorder를 넣어 버튼 사이의 경계를 표현해 줄 수 있고,
addTarget 메서드가 아닌, UITapGestureRecognizer를 사용하여 tap 되었을 때 동작을 정의하였습니다.
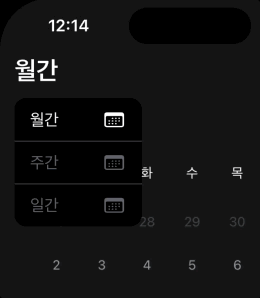
이 컴포넌트가 연결된 vc는 기존과 동일한 하기에 눈에 보이는 화면은 동일합니다.
완전히 다른 코드인데 같은 화면으로 노출된다니.. (๑˃̵ᴗ˂̵)و ♡
UIView로 다시 수정한 코드
- UIButton →UIView : UIButton 대신 UIView를 사용하고, UILabel과 UIImageView 추가 → 버튼의 텍스트와 이미지를 설정
- 구분선 제거:topSeparator와 bottomSeparator를 제거하고, 대신 addBorders() 메서드를 사용하여 버튼 사이의 경계 추가
- Gesture Recognizers 사용:UITapGestureRecognizer를 사용하여 UIView가 tap되었을 때의 동작 정의
import UIKit
import SnapKit

protocol PeriodPickerButtonViewDelegate: AnyObject {
    func didTapdailyButton()
}

class PeriodPickerButtonView: UIView {

    weak var delegate: PeriodPickerButtonViewDelegate?

    private let buttonView1: UIView = {
        let view = UIView()
        view.backgroundColor = .clear
        let label = UILabel()
        label.text = "월간"
        label.textColor = .challendarBlack60
        label.font = .systemFont(ofSize: 17)
        let imageView = UIImageView(image: UIImage(systemName: "calendar"))
        imageView.tintColor = .challendarBlack60

        view.addSubview(label)
        view.addSubview(imageView)

        label.snp.makeConstraints { make in
            make.centerY.equalToSuperview()
            make.leading.equalToSuperview().offset(16)
        }

        imageView.snp.makeConstraints { make in
            make.centerY.equalToSuperview()
            make.trailing.equalToSuperview().offset(-16)
            make.leading.equalTo(label.snp.trailing).offset(44)
        }

        return view
    }()

    private let buttonView2: UIView = {
        let view = UIView()
        view.backgroundColor = .clear
        let label = UILabel()
        label.text = "주간"
        label.textColor = .challendarBlack60
        label.font = .systemFont(ofSize: 17)
        let imageView = UIImageView(image: UIImage(systemName: "calendar"))
        imageView.tintColor = .challendarBlack60

        view.addSubview(label)
        view.addSubview(imageView)

        label.snp.makeConstraints { make in
            make.centerY.equalToSuperview()
            make.leading.equalToSuperview().offset(16)
        }

        imageView.snp.makeConstraints { make in
            make.centerY.equalToSuperview()
            make.trailing.equalToSuperview().offset(-16)
            make.leading.equalTo(label.snp.trailing).offset(44)
        }

        return view
    }()

    private let buttonView3: UIView = {
        let view = UIView()
        view.backgroundColor = .clear
        let label = UILabel()
        label.text = "일간"
        label.textColor = .challendarBlack60
        label.font = .systemFont(ofSize: 17)
        let imageView = UIImageView(image: UIImage(systemName: "calendar"))
        imageView.tintColor = .challendarBlack60

        view.addSubview(label)
        view.addSubview(imageView)

        label.snp.makeConstraints { make in
            make.centerY.equalToSuperview()
            make.leading.equalToSuperview().offset(16)
        }

        imageView.snp.makeConstraints { make in
            make.centerY.equalToSuperview()
            make.trailing.equalToSuperview().offset(-16)
            make.leading.equalTo(label.snp.trailing).offset(44)
        }

        return view
    }()

    private var buttonViews: [UIView] {
        return [buttonView1, buttonView2, buttonView3]
    }

    override init(frame: CGRect) {
        super.init(frame: frame)
        configureUI()
        configureConstraint()
        configureUtil()
    }

    required init?(coder: NSCoder) {
        fatalError("init(coder:) has not been implemented")
    }

    private func configureUI() {
        addSubview(buttonView1)
        addSubview(buttonView2)
        addSubview(buttonView3)

        layer.cornerRadius = 12
        clipsToBounds = true
        backgroundColor = .black
    }

    private func configureConstraint() {
기존 코드 (이전 글 참고* )
- UIButton 사용:UIButton을 사용하여 각 버튼을 정의. UIButton.Configuration를 사용해 버튼의 텍스트와 이미지를 설정
- 구분선: topSeparator와 bottomSeparator를 사용하여 버튼 사이의 구분선을 추가
- 버튼 액션 설정: addTarget 메서드를 사용하여 버튼이 탭되었을 때의 동작을 정의
import UIKit
import SnapKit

protocol PeriodPickerButtonViewDelegate: AnyObject {
    func didTapdailyButton()
}

class PeriodPickerButtonView: UIView {

    weak var delegate: PeriodPickerButtonViewDelegate?

    private let button1: UIButton = {
         let button = UIButton()
         var configuration = UIButton.Configuration.plain()
         configuration.title = "월간"
         configuration.image = UIImage(systemName: "calendar")
         configuration.imagePadding = 44
         configuration.imagePlacement = .trailing
         configuration.baseBackgroundColor = .clear
         button.configuration = configuration
         button.setTitleColor(.challendarBlack60, for: .normal)
         button.setTitleColor(.white, for: .selected)
         button.tintColor = .challendarBlack60
         button.contentHorizontalAlignment = .center
         return button
     }()

    private let button2: UIButton = {
        let button = UIButton()
        var configuration = UIButton.Configuration.plain()
        configuration.title = "주간"
        configuration.image = UIImage(systemName: "calendar")
        configuration.imagePadding = 44
        configuration.imagePlacement = .trailing
        configuration.baseBackgroundColor = .clear
        button.configuration = configuration
        button.setTitleColor(.challendarBlack60, for: .normal)
        button.setTitleColor(.white, for: .selected)
        button.tintColor = .challendarBlack60
        button.contentHorizontalAlignment = .center
        return button
    }()

    private let button3: UIButton = {
        let button = UIButton()
        var configuration = UIButton.Configuration.plain()
        configuration.title = "일간"
        configuration.image = UIImage(systemName: "calendar")
        configuration.imagePadding = 44
        configuration.imagePlacement = .trailing
        configuration.baseBackgroundColor = .clear
        button.configuration = configuration
        button.setTitleColor(.challendarBlack60, for: .normal)
        button.setTitleColor(.white, for: .selected)
        button.tintColor = .challendarBlack60
        button.contentHorizontalAlignment = .center
        return button
    }()

    private let topSeparator: UIView = {
        let view = UIView()
        view.backgroundColor = .challendarBlack60
        return view
    }()

    private let bottomSeparator: UIView = {
        let view = UIView()
        view.backgroundColor = .challendarBlack60
        return view
    }()

    private var buttons: [UIButton] {
        return [button1, button2, button3]
    }

    override init(frame: CGRect) {
        super.init(frame: frame)
        configureUI()
        configureConstraint()
        configureUtil()
    }

    required init?(coder: NSCoder) {
        fatalError("init(coder:) has not been implemented")
    }

    private func configureUI() {
        addSubview(button1)
        addSubview(button2)
        addSubview(button3)
        addSubview(topSeparator)
        addSubview(bottomSeparator)

        layer.cornerRadius = 12
        clipsToBounds = true
        backgroundColor = .black
    }

    private func configureConstraint() {
        button1.snp.makeConstraints { make in
            make.top.leading.trailing.equalToSuperview()
            make.height.equalTo(44)
        }

        button2.snp.makeConstraints { make in
            make.top.equalTo(button1.snp.bottom)
            make.leading.trailing.equalToSuperview()
            make.height.equalTo(44)
        }

        button3.snp.makeConstraints { make in
            make.top.equalTo(button2.snp.bottom)
            make.leading.trailing.bottom.equalToSuperview()
            make.height.equalTo(44)
        }

        topSeparator.snp.makeConstraints { make in
            make.top.equalTo(button2.snp.top)
            make.leading.trailing.equalToSuperview()
            make.height.equalTo(0.2)
        }

        bottomSeparator.snp.makeConstraints { make in
            make.top.equalTo(button2.snp.bottom)
            make.leading.trailing.equalToSuperview()
            make.height.equalTo(0.2)
        }
    }

    private func configureUtil() {
        setupActions()
    }

    private func setupActions() {
        button1.addTarget(self, action: #selector(buttonTapped(_:)), for: .touchUpInside)
        button2.addTarget(self, action: #selector(buttonTapped(_:)), for: .touchUpInside)
        button3.addTarget(self, action: #selector(dailyButtonTapped), for: .touchUpInside)
    }

    @objc private func dailyButtonTapped() {
         delegate?.didTapdailyButton()
     }

    @objc private func buttonTapped(_ sender: UIButton) {
        buttons.forEach {
            $0.isSelected = false
            $0.tintColor = .challendarBlack60
        }
        sender.isSelected = true
        sender.tintColor = .white
    }
}
'iOS 앱 개발자 프로젝트' 카테고리의 다른 글
| [iOS] collectionView의 custom header 설정하기 (0) | 2024.06.08 |
|---|---|
| [iOS] picker 버튼을 dropdown UIView와 연결하기 (0) | 2024.06.08 |
| [iOS] picker 버튼에 이미지 추가하기 (UIButton) (0) | 2024.06.05 |
| [iOS] 옵션 선택을 위한 picker 버튼 만들기 (0) | 2024.06.05 |
| [iOS] YZCenterFlowLayout 이해하기 (0) | 2024.06.04 |


