segue를 이용한 화면전환에 이어,
instantiateViewController를 이용한 화면전환을 연습해봅니다.
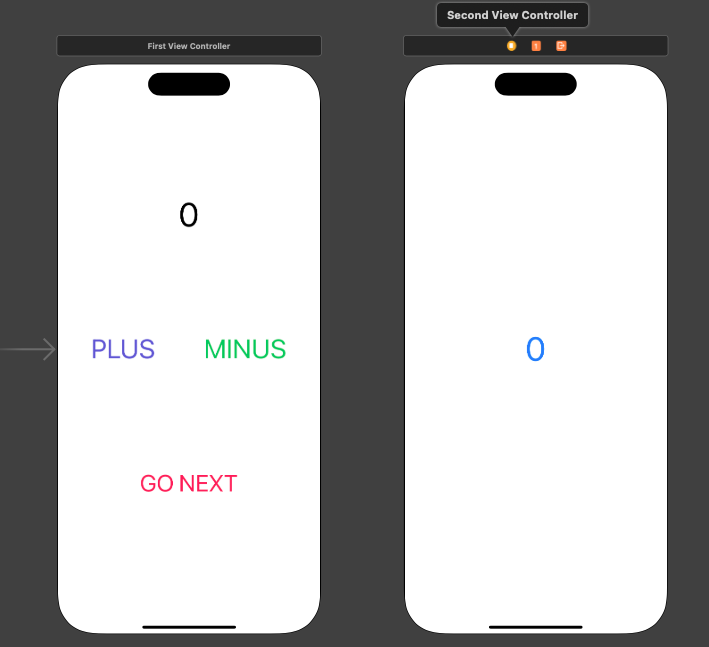
첫 화면에 PLUS, MINUS, GO NEXT 버튼과 숫자 레이블을,
두 번째 화면에는 첫 화면과 동일한 숫자 레이블을 화면 상의 컬러만 바꿔서 넣어봅니다.
이제 벌써 세 번째니까..
코드 작업 전 VC 및 storyboard 기본 세팅은 생략!
첫 화면에 버튼 세 개와 숫자 레이블 하나,
두 번째 화면에 숫자 레이블 하나를 컬러만 바꿔서 넣어준다.
(현재 0 으로 보여지는 두 레이블은 늘 동일한 결과 값이 보여질거다.)
First VC
가장 기본적이기에 가장 중요한..!
UIViewController를 상속받아 만들어진 FirstViewController 클래스를 정의한다.
import UIKit

class FirstViewController: UIViewController {
그리고, count라는 변수를 선언하고 초기값은 0으로 설정하는데,
이 변수는 화면에 표시되는 카운트 값을 저장하는 그릇의 역할을 한다.
var count: Int = 0
countLabel이라는 이름의 UILabel object를 아울렛으로 연결.
이 Label은 바로 위에서 만든 count 변수 값이 화면에 보여지는 역할을 한다.
@IBOutlet weak var countLabel: UILabel!
그 다음은 button을 위한 action method들
우선 PLUS, MINUS 버튼 작동을 위해,
count 값을 1 증가시키거나 감소시키고, countLabel의 text를 업데이트 해준다.
(incrementButton(_:) 메서드 / decrementButton(_:) 메서드)
    @IBAction func incrementButton(_ sender: Any) {
        count += 1
        countLabel.text = "\(count)"
    }

    @IBAction func decrementButton(_ sender: Any) {
        count -= 1
        countLabel.text = "\(count)"
    }
다음 페이지로 이동하는 버튼인 Go Next 동작을 위해
nextButton(_;) 메서드도 필요하다.
이번 연습의 핵심인 instantiateViewController가 사용되는 부분인데,
현재 count 변수 값을 SecondViewController로 전달하고, (인스턴스화 하여 전달!)
해당 ViewController를 present 한다.
    @IBAction func nextButton(_ sender: Any) {
        if let secondVC = self.storyboard?.instantiateViewController(withIdentifier: "SecondViewController") as? SecondViewController {
            secondVC.receivedCount = self.count
            self.present(secondVC, animated: true, completion: nil) } else {
만약 SecondViewController를 "인스턴스화" 하는 데 실패하면
오류 메시지를 출력! (← 필수 아니다. 없애도 실행된다.)
print("Failed to instantiate SecondViewController")
First VC 전체 코드
import UIKit

class FirstViewController: UIViewController {

    var count: Int = 0

    @IBOutlet weak var countLabel: UILabel!

    @IBAction func incrementButton(_ sender: Any) {
        count += 1
        countLabel.text = "\(count)"
    }

    @IBAction func decrementButton(_ sender: Any) {
        count -= 1
        countLabel.text = "\(count)"
    }

    @IBAction func nextButton(_ sender: Any) {
        if let secondVC = self.storyboard?.instantiateViewController(withIdentifier: "SecondViewController") as? SecondViewController {
            secondVC.receivedCount = self.count
            self.present(secondVC, animated: true, completion: nil) } else {
                // Handle the case where the view controller instantiation fails
                print("Failed to instantiate SecondViewController")
            }
    }
}
Second VC
receivedCount 변수를 선언하여 이 변수가 FirstViewController에서 전달받은 count값을 담아두도록 한다.
var receivedCount: Int = 0
그리고 앞의 FirstVC 에 있는 숫자 레이블인 countLabel과 동일한 레이블을 이곳에도 동일하게 UILabel 객체로 연결하여 receivedCount 변수의 값을 화면에 표시하는 데 사용한다.
@IBOutlet weak var countLabel: UILabel!
마지막으로 ViewController 생명주기 중 하나인
viewDidLoad() 메서드는 View가 메모리에 로드되었을 때 호출되는데,
countLabel의 텍스트를 receivedCount 변수의 값으로 설정한다. 즉, View가 로드되면 해당 값을 coundLabel에 설정해서 화면에 보여주는 역할을 한다.
    override func viewDidLoad() {
        super.viewDidLoad()
        countLabel.text = "\(receivedCount)"
    }
Second VC 전체 코드
import UIKit

class SecondViewController: UIViewController {

    var receivedCount: Int = 0

    @IBOutlet weak var countLabel: UILabel!

    override func viewDidLoad() {
        super.viewDidLoad()
        countLabel.text = "\(receivedCount)"
    }
}
'iOS 앱 개발자 프로젝트 > iOS 입문' 카테고리의 다른 글
| [iOS] Connecting the Dots, Connecting the VCs... (4) | 2024.04.17 |
|---|---|
| [iOS] JSON (JavaScript Object Notation) (0) | 2024.04.09 |
| [iOS] ViewController - Lifecycle Method (0) | 2024.04.02 |
| [iOS] Closure를 활용한 VC 통신 (feat. prepare method) (0) | 2024.04.01 |
| [iOS] 간단한 카운트 화면 만들기 (0) | 2024.03.24 |


